development / git /
Accessing the FieldTrip source code through Git
The FieldTrip code and website are both maintained on https://github.com/fieldtrip.
To quickly get access to the code, you would do the following from the command line or the equivalent in a graphical git interface, such as the GitHub desktop.
git clone https://github.com/fieldtrip/fieldtrip.git
This allows you to easily track the changes that we make to the code. If you also want to contribute back, please make an account on GitHub, fork fieldtrip/fieldtrip to your own account and read on for a complete tutorial.
Summary of the development workflow
We use git (the software) and github.com (the website, see below) in combination with a Forking Workflow for the development of the code, and for maintenance of the documentation on the website. We complement this with code reviews by the core team and quality control using a set of test scripts. A short summary of the procedure is as follows
- The contributor makes a fork of the
fieldtrip/fieldtrip(or thefieldtrip/website) repository to his/her personal GitHub page. - He/she makes a clone of the
personal/fieldtrip(or thepersonal/website) repository to his/her own computer. It is recommended to set thefieldtrip/fieldtriprepository as the upstream remote. - He/she creates a new branch, makes the suggested changes, commits them to that branch, pushes that branch to his/her own fork (on GitHub) and submits a pull request.
- The core team reviews the pull request. The suggested change should make sense, fit in the larger strategy, should be consistent with other code, and code should be documented.
- The code in the pull request is optionally tested by the core team to ensure that it does not break anything.
- After successful reviewing and testing, the core team merges the pull request with the master branch.
In the next section we will explain the technical terms and slang, and will give a more gentle step-by-step introduction.
How to contribute with git and github.com
We welcome the contributions of all external users, even if the changes are small, consist and/or only of a few lines of code, or fix a typo on the website. The Git version control system offers a simple and straightforward way to contribute to FieldTrip and to make your contribution recognized!
What is git?
Git is version control system to keep track of the changes to files and maintain a consistent repository, like SVN. While SVN follows a linear approach to versioning, where each user makes some changes to the main code and then a second user can make the next change, Git allows for multiple users to work in parallel and then merge their code in the main repository. This approach scales very well, considering that, for example, the Linux kernel and Android use git.
There are lots of resources available on the internet to learn more about Git. The starting point is the official Git documentation. If you have a question, it’s most likely already been answered on Stack Overflow. Git is extremely powerful and flexible, so the following tutorial will give only the most basic ideas and tools to modify the FieldTrip code.
Basic concepts
Git usually lives on two levels:
- on your local computer
- on a remote server, for example github.com, gitlab.com or bitbucket.com
push, pull, clone
Both your local computer and the remote server contain a full copy of the whole repository. The basic idea is that you make some changes on your local copy and then send them to the remote server. Sending changes to a remote repository is called pushing and receiving changes from a remote repository to your local machine is called pulling. The first time that you want to copy a complete repository from a remote server to your local machine, you need to clone the repository.
commit
Your local repository is a complete repository of the whole source code. As such, you can modify some files (or add some files) and then include these changes in the local repository. This procedure is called a commit. The changes that are committed to your local repository are called commits.
branch, merge
One of the most powerful features of Git is the idea of branching: Branching means you diverge from the main line of development and continue to do work without messing with that main line. So, from your local repository, you can create a new branch, make some changes, and commit them. If you are happy with the changes, you can merge your new branch with the main development line. Branches are very flexible because they allow you to develop new features without compromising the main repository. You can easily switch between the main branch (often called master) and experimental branches.
Summary of the main commands
To recap, the main commands that you’ll need are:
- clone to create a new local repository based on a remote repository
- commit to add some changes to your local repository
- push to send your local changes to the remote repository
- pull to receive the remote changes to your local repository (it runs two processes: fetch, where the remote changes are downloaded, and merge, where the changes are integrated into your local repository’s branches)
- branch to list the branches
- checkout to switch to an existing branch
- checkout -b to create a new branch
- merge to merge a branch with your main local branch
You can use any of these commands on the command line, in Linux, Mac or Windows, by doing:
git name_of_the_command <arguments>
For example, using:
git checkout master
you will switch from a side branch into the main branch of your repository.
What is GitHub?
github.com is a popular website for sharing code and for collaborating. It has a clean and intuitive website interface. Many large projects are hosted there, including FieldTrip.
How to add a feature or fix a bug
You only have read permission for the FieldTrip repository on GitHub, this means that you cannot directly change the code of the FieldTrip repository. What you can do, as demonstrated below, is:
- Copy the FieldTrip repository under your private account on github.com (this is called forking).
- This new personal repository will become your remote repository. You will need clone the remote repository onto your local machine.
- You will create a new branch, edit some files, and commit them to the developmental branch of your local repository.
- Then you can push this developmental branch to your remote repository.
- You will then tell to the developers of FieldTrip to check these changes in your remote repository, using a pull request.
All the highlighted words are the new concepts explained above. Forking and pull request are two main concepts when working with multiple remote repositories. I will use them throughout the tutorial and are the words that you will need to successfully google possible problems. If they are not clear, refer to the main documentation.
Tutorial
Now that the main concepts are explained, we will try to add a new feature to FieldTrip using a minimal example. In our case, what we think that FieldTrip really needs is that when you run ft_defaults, you get a text saying Welcome to FieldTrip. So we need to create a new function that prints Welcome to FieldTrip and modify the existing function ft_defaults to run our new function. We expect that you already have git running on your system (see installation instructions) and that you have an account on github.com (see set up git). Let’s say that your username on GitHub is USERNAME.
1. Fork the main FieldTrip
Go with your web browser to https://github.com/fieldtrip/fieldtrip and click on the right-hand side, towards the top, on Fork. This will create a new remote repository in your GitHub account at the address: https://github.com/USERNAME/fieldtrip. The title of your repository will say:
USERNAME/fieldtrip
forked from fieldtrip/fieldtrip
2. Clone your remote repository
Now you can just clone your remote repository. There are two equivalent methods to connect to your remote repository: https (see setup instructions) or ssh (see setup instructions). If you’re using https, then:
git clone https://github.com/USERNAME/fieldtrip.git
If you’re using SSH, use:
git clone git@github.com:USERNAME/fieldtrip.git
Now you have a local repository of FieldTrip that you can work on. Then go into the just-created FieldTrip directory:
cd fieldtrip
3. Create an experimental branch
Before you start editing files, create a new branch. We will call our new branch welcome. Let’s create it:
git checkout -b welcome
and it’ll tell you:
Switched to a new branch 'welcome'
If you have filed an issue on GitHub, you could name your new branch issueXXXX with the number; this helps linking your code suggestions to the discussion on that specific bug or issue. If you have not filed an issue yet, just give the new branch a short name that refers to the things you want to change.
4. Add and edit files
Now we will create a function that displays Welcome to FieldTrip on screen. Let’s call it ft_welcome.m, just as you’d create any new MATLAB function.
When you create a new function or edit an existing one, follow the code guidelines for consistent and readable code.
In addition to this function, we will also modify the function ft_defaults.
5. Commit your changes
To see how git reacts to these changes, you can now type:
git status
It will tell you:
# On branch welcome
# Changes not staged for commit
#   (use "git add `<file>`..." to update what will be committed)
#   (use "git checkout -- `<file>`..." to discard changes in working directory)
#
#  modified:   ft_defaults.m
#
# Untracked file
#   (use "git add `<file>`..." to include in what will be committed)
#
#  ft_welcome.m
no changes added to commit (use "git add" and/or "git commit -a")
If you want to review the changes you made, you can type:
git diff
Now we add our changes to the commit:
git add ft_welcome.m ft_defaults.m
and now git status will tell you:
# On branch welcome
# Changes to be committed
#   (use "git reset HEAD `<file>`..." to unstage)
#
#  modified:   ft_defaults.m
#  new file:   ft_welcome.m
#
You can now commit these changes.
git commit -m "print welcome message when executing ft_defaults"
where the option -m allows you to add a log entry. git will return:
1 file changed, 1 insertion(+)
create mode 100644 ft_welcome.m
Follow these guidelines when writing a log entry.
Switch to master
While you are working on the developmental branch called welcome, you might want to run some analysis on the main branch (called by default master). You can easily switch to the main branch with:
git checkout master
and then you go back to the developmental branch with:
git checkout welcome
You can see on which branch you are with
git branch
Switching between branches is really fast, so do not be afraid of doing it when necessary.
6. Push the commits
We modified our local repository, but the remote repository has not changed. We need to push our commits to our personal remote repository (i.e. our fork). By default, the remote repository is called origin. You can rename it. If you want more information about remote repository, just type:
git remote -v
The code to push commits is:
git push origin welcome
which means that we are pushing the commits in the branch called welcome to the remote repository called origin. This will create a new branch in your remote repository, as the last line of the output will kindly tell you:
...

* [new branch]      welcome -> welcome
7. Make a pull request
Go to your copy of the repository on github.com to review the changes. By default you are shown the branch master, so you should switch to the newly created branch called welcome. Review the commits, by clicking on commits. Click on pull request in the top middle. The next page will show you the changes that are part of the pull request.
You are about to send the changes to the main developers of FieldTrip, so explain in the box what you did and why. Please, review the commits very carefully before sending the pull request. It sometimes happens that you have commits that you forgot about and you did not intend to share.
Do not click on Send Pull Request when finishing this tutorial.
8. Clean up
When you are done and your suggestion has been merged, you can delete the branch welcome on the local and remote repository. To delete the branch on your local and remote repository, you can use:
git branch -D welcome
git push origin :welcome
9. Keeping up to date
Your suggested contributions to FieldTrip will not be the only changes; the code on the master branch is constantly being updated by other developers/contributors as well. This means that you should regularly synchronize to benefit from these updates, and to ensure that you won’t be making changes to an outdated version of the code.
It is important to first pull the changes from others before you start implementing your own changes, otherwise your (new) changes might conflict with already accepted changes to the code.
Synchronizing between the different repositories is done by using your local (i.e. hard disk) copy as intermediary. By default your personal copy of the repository on GitHub will be called the origin. You can check this with:
git remote -v
which will show you
origin  git@github.com/USERNAME/fieldtrip.git (fetch)
origin  git@github.com/USERNAME/fieldtrip.git (push)
or the corresponding URL with https instead of git.
To synchronize with the official FieldTrip repository on GitHub, you should also add it as a remote. Best practice is to call it the upstream repository. You add it with:
git remote add upstream https://github.com/fieldtrip/fieldtrip.git
git remote -v
will now show you both remotes:
origin  git@github.com/robertoostenveld/fieldtrip.git (fetch)
origin  git@github.com/robertoostenveld/fieldtrip.git (push)
upstream  https://github.com/fieldtrip/fieldtrip.git (fetch)
upstream  https://github.com/fieldtrip/fieldtrip.git (push)
You can pull (download) from the upstream repository and push (upload) to your own origin repository.
To pull the changes from the master branch of the (official) upstream FieldTrip repository, you would do
git checkout master
git pull upstream master
This may (or may not) show changes to files and new files that were added. Subsequently, you can push those changes to the master branch of your origin personal GitHub repository with:
git push origin master
After this, both the local copy on your hard drive and your copy on github.com will be up to date with the official release.
Troubleshooting: pushing your master branch to your origin personal GitHub repository may throw the error “This repository is configured for Git LFS but ‘git-lfs’ was not found on your path. If you no longer wish to use Git LFS, remove this hook by deleting .git/hooks/pre-push.” This .git directory can be found in the local directory of your repository (../fieldtrip/.git).
Working with remotes is explained in more detail in the Git book.
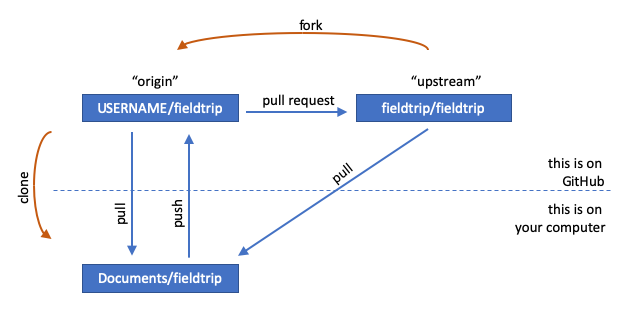
Graphical summary
The following figure gives a graphical summary of some of the steps and terms.
Some notes with respect to contributing to the website through git.
Edits to existing webpages.
Simple edits to the website can be made through the online github interface. At the bottom of each page there’s an “edit this page on GitHub” link, which takes you to github, and allows you to make changes in the markdown files. Once you commit the changes, a Pull Request is generated automatically.
Creation of new content.
If you want to create new content, e.g., a frequently asked question, or want to add (or replace) figures, you need to create a fork of the website repository, and make a clone locally. For instance, if you then want to create a new faq, you should create a new markdown file in the faq-directory of the repository (to keep things somewhat organised). In order for this page to be found, a link to it should be created in the faq.md file, which is in the website’s repo top folder. Links to other files in the repo, both to webpages and figures, are to be formatted as follows: _[
Want more?
github.com offers lots of documentation. In particular, see the detailed instructions to fork a repository and to create a pull request. If you plan to continue development, I suggest to set up your remotes with origin pointing to your personal remote repository and upstream pointing to https://github.com/fieldtrip/fieldtrip, as described in fork a repository.
Below are some helpful resources for you to go beyond the basic recipe and become a real Git “connaisseur”:
Step-by-step guides
- As plain text http://www-cs-students.stanford.edu/~blynn//gitmagic/ch01.html
- Or more playful https://learngitbranching.js.org/
- Examples of different workflows https://www.atlassian.com/git/tutorials/comparing-workflows
Official git documentation
- Contains a reference manual https://git-scm.com/docs
- A book with more conceptual in-depth explanations https://git-scm.com/book/en/v2
- A couple of short introductory videos https://git-scm.com/videos