Streaming realtime EEG data to and from Arduino
The following is a scratch pad for a demo that I (=Robert) have prepared for the BrainGain public showcase event. It consists of three Arduino devices, a Raspberry Pi and and a number of laptops. The flow of the data is as follows:
- arduino1: read data from a gravity sensor, write to bluetooth just like ModEEG
- laptop computer runs the FieldTrip buffer, the modeeg2ft application, and the viewer application for the visualization of the 3 sensor channels
- arduino2: connects to the network, read data from FieldTrip buffer, write to RFM12b
- arduino3: read data from RFM12b, blink LEDs
Other laptop computers and a Raspberry Pi were connected simultaneously to show (using the viewer realtime visualization) that the FieldTrip realtime EEG interface runs on various operating systems (Windows, Linux, macOS) and on various hardware architectures (Intel, PPC, ARM).
Arduino 1: simulate EEG recording
The purpose of this device is to simulate an online data stream using a gravity sensor. By shaking the box, the (x, y, z) signals will fluctuate. This is sent over bluetooth to a computer, which can visualize and/or process the continuously sampled signal as if it were normal EEG.
It is based on a Sparkfun Pro Micro 3V3. The connection to the “EEG acquisition” computer is through a BlueSMiRF bluetooth modem. The realtime signal is provided by a triple axis accelerometer module.
The Bluetooth module was configured with the following settings. See http://www.sparkfun.com/datasheets/Wireless/Bluetooth/rn-bluetooth-um.pdf
Settings BTA=00066649542F BTName=RN42-542F Baudrt=57.6 Parity=None Mode =Slav Authen=0 Encryp=0 PinCod=1234 Bonded=0 Rem=000666495493
The modeeg synchronization code is 0xA5 0x5A, or 165 90 in decimal.
Arduino 2: interface with FieldTrip buffer
The purpose of this device is to demonstrate that an arduino with ethershield is capable of connecting to a FieldTrip buffer over TCP/IP, read the data and do something with it. This device is connected with Ethernet, reads some data and passes it on using a wireless RFM12b (433/886 MHz) connection.
It is based on a Sparkfun Pro Micro Arduino Pro Mini 3V3. Ethernet is provided by a WIZnet W5100 network module. Wireless connectivity is provided by a RFM12B module.
This comment gives the SPI interface pins for the Sparkfun Pro Micr
-
SPI: 10 (SS), 16 (MOSI), 14 (MISO), 15 (SCK)
-
External Interrupts: ?
The SPI interface for the Arduino Pro Mini is on
- SPI: 10 (SS), 11 (MOSI), 12 (MISO), 13 (SCK)
The WIZnet W5100 pin connections ar
| WIZnet W5100 | Sparkfun Pro Micro | Arduino Pro Mini |
|---|---|---|
| J1-1 (MOSI) | 16 | 11 |
| J1-2 (MISO) | 14 | 12 |
| J2-1 (3.3) | 3.3v | 3.3v |
| J2-2 (RESET) | Reset | Reset |
| J2-3 (SCLK) | 15 | 13 |
| J2-4 (SCS) | 10 | 10 |
| J2-9 (GND) | Ground | Ground |
The connections for an Arduino Uno to an RFM12B module are given here, here and here.
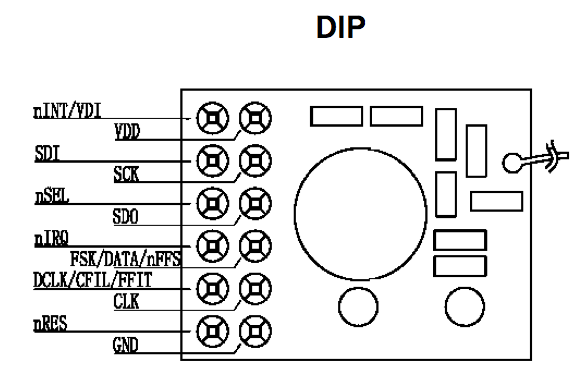
I am using the DIP version of the RFM12B module. The pin connections ar
| RFM12B | Arduino Pro Mini |
|---|---|
| VDD | 3.3v |
| SCK | 13 (SCK) |
| SDO | 12 (MISO) |
| FSK/DATA/nFSS | |
| CLK | |
| GND | GND |
| nINT/VDI | |
| SDI | 11 (MOSI) |
| nSEL | 10 (SS) |
| nIRQ | IRQ |
| DCLK/CFIL/FFIT | |
| nRES |
Arduino 3: linear LED array
The purpose of this device is to demonstrate that something can be controlled. It reads the control signal using a wireless RFM12b (433/886 MHz) connection and visualizes it with a 10-segment LED array. Instead of driving the LED array, it could also act as a switch or drive a servo motor.
It is based on a 3V3 Arduino Pro Mini 5V Arduino Mini.
- SPI: 10 (SS), 11 (MOSI), 12 (MISO), 13 (SCK)
- External Interrupts: 2 and 3 (?)
Wireless connectivity is provided by a RFM12B module and uses this library.
See also
- development/realtime/modulareeg for the bluetooth OpenEEG interface
- here on GitHub for the Arduino specific source code
