documentation / example / other / opm_straighthelmet /
Designing an OPM helmet with a straight opening at the bottom
If you design an OPM helmet on the basis of an individual MRI, you can end up with a helmet that “curves in” at the bottom which would make it impossible for the participant to actually slide their head in.
The following example code provides a solution by modifying the segmentation such that it extends in a straight direction towards the bottom. This results in a helmet with an opening at the bottom that is as wide as the widest point of the head.
This example follows the same design principle as the tutorial for designing a custom 3D printed OPM helmet. The anatomical MRI used in this example is available from our download server.
% read the anatomical MRI
mri = ft_read_mri('individual.nii');
% use the same realignment to the CTF coordinates as in the OPM helmet design tutorial
nas_vox = [ 102 217 123 ];
ini_vox = [ 90 18 104 ];
lpa_vox = [ 20 135 103 ];
rpa_vox = [ 173 121 95 ];
cfg = [];
cfg.method = 'fiducial';
cfg.coordsys = 'ctf';
cfg.fiducial.nas = nas_vox;
cfg.fiducial.lpa = lpa_vox;
cfg.fiducial.rpa = rpa_vox;
mri_realigned = ft_volumerealign(cfg, mri);
% reslice the MRI and place it nicely in the middle
cfg = [];
cfg.xrange = [ -97.5000 157.5000] - 30;
cfg.yrange = [-127.5000 127.5000];
cfg.zrange = [ -87.5000 167.5000] - 5;
mri_resliced = ft_volumereslice(cfg, mri_realigned);
% make the segmentation of the scalp surface
cfg = [];
cfg.output = 'scalp';
mri_segmented = ft_volumesegment(cfg, mri_resliced);
% construct a triangulated mesh for the scalp surface
cfg = [];
cfg.method = 'projectmesh';
cfg.numvertices = 4000;
headshape = ft_prepare_mesh(cfg, mri_segmented);
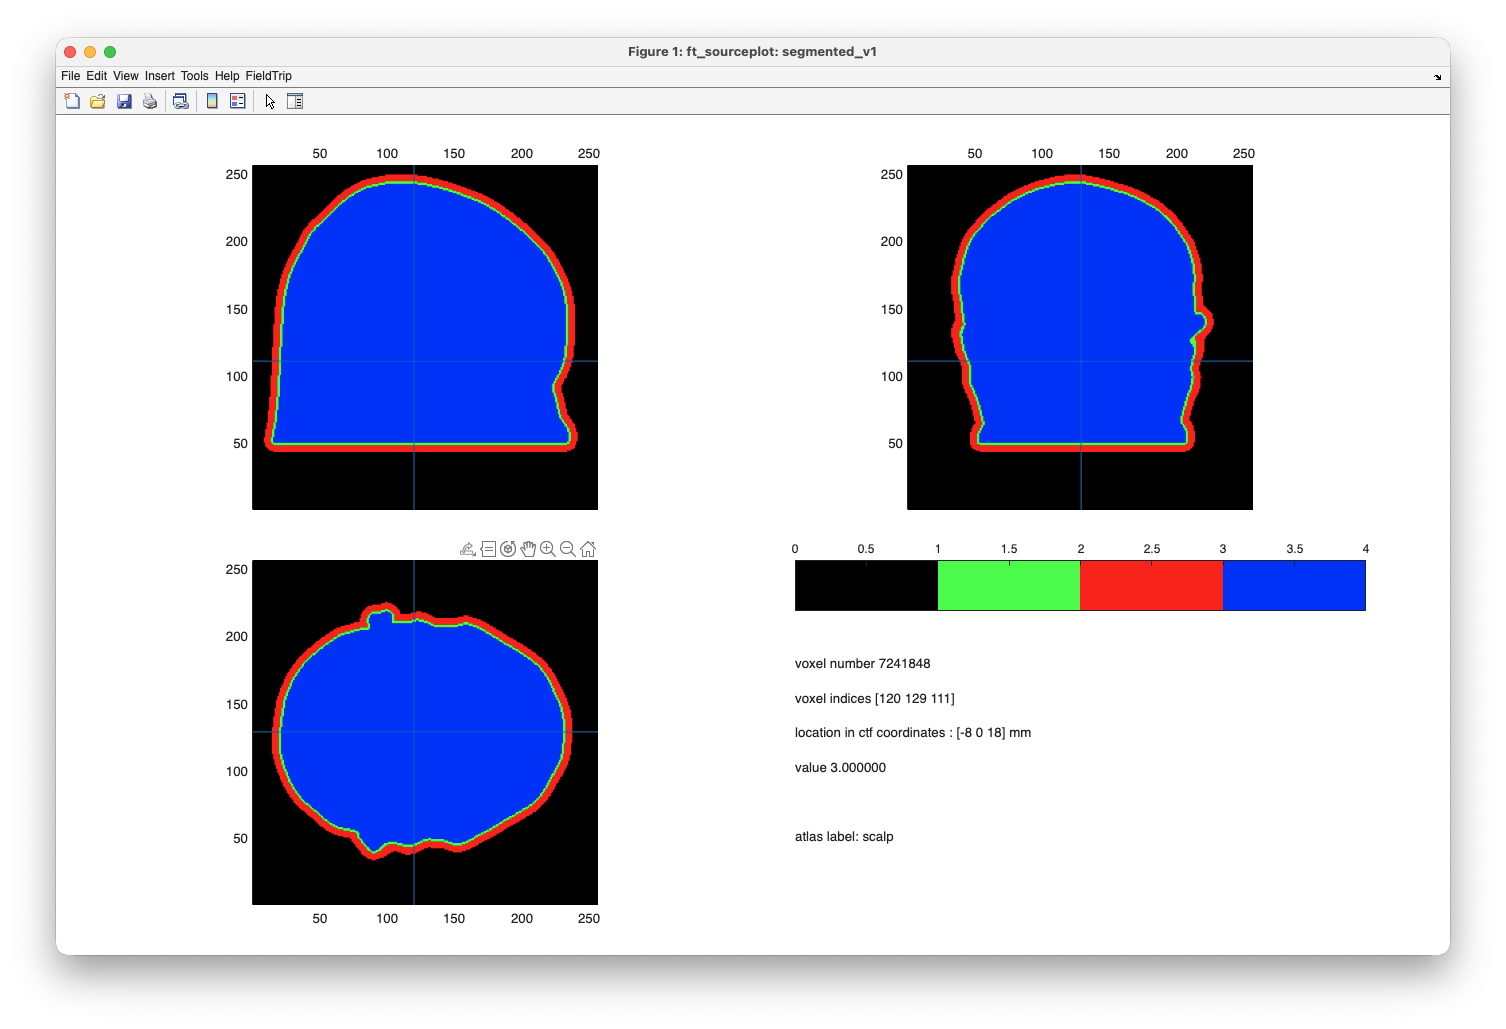
% make a copy of the segmentation, remove the lower part of the head
segmented_v1 = mri_segmented;
segmented_v1.scalp(:,:,1:50) = 0;
% inflate the segmentation to make an airgap and a helmet
segmented_v1.airgap = imdilate(segmented_v1.scalp, strel('sphere', 2)); % 2 mm air gap
segmented_v1.helmet = imdilate(segmented_v1.airgap, strel('sphere', 5)); % 5 mm thick helmet
% convert to indexed representation to allow for plotting as if it were "functional" data
segmented_v1 = ft_checkdata(segmented_v1, 'segmentationstyle', 'indexed');
% plot the segmentation of the headshape, airgap and helmet
cfg = [];
cfg.funparameter = 'tissue';
cfg.location = [0 0 0];
cfg.locationcoordinates = 'head';
cfg.atlas = mri_indexed;
cfg.funcolormap = [
0 0 0 % black
0 1 0 % green
1 0 0 % red
0 0 1 % blue
];
cfg.funcolorlim = [0 4];
ft_sourceplot(cfg, segmented_v1)
%%

% make a copy, remove the lower part of the head

segmented_v2 = mri_segmented;
segmented_v2.scalp(:,:,1:50) = 0;

% for each vertical column fill the segmentation from the bottom to the top

for i=1:segmented_v2.dim(1)
for j=1:segmented_v2.dim(2)
    column = segmented_v2.scalp(i,j,:);
    if ~any(column)
    continue
    else
    bottom = 50;
    top    = find(column, 1, 'last');
    segmented_v2.scalp(i,j,bottom:top) = 1;
    end
end % for j
end % for i

% inflate the segmentation to make an airgap and a helmet. same as before

segmented_v2.airgap = imdilate(segmented_v2.scalp,  strel('sphere', 2)); % 2 mm air gap
segmented_v2.helmet = imdilate(segmented_v2.airgap, strel('sphere', 5)); % 5 mm thick helmet

% convert to indexed representation to allow for plotting as if it were "functional" data
segmented_v2 = ft_checkdata(segmented_v2, 'segmentationstyle', 'indexed');

% plot the segmentation of the headshape, airgap and helmet

cfg = [];
cfg.funparameter = 'tissue';
cfg.location = [0 0 0];
cfg.locationcoordinates = 'head';
cfg.atlas = mri_indexed;
cfg.funcolormap = [
0 0 0 % black
0 1 0 % green
1 0 0 % red
0 0 1 % blue
];
cfg.funcolorlim = [0 4];
ft_sourceplot(cfg, segmented_v2)

% make a triangulated surface mesh of the headshape, airgap and helmet

cfg = [];
cfg.method = 'projectmesh';
cfg.numvertices = 4000;
headshape_v2 = ft_prepare_mesh(cfg, segmented_v2);

helmet_inside  = headshape_v2(1); % this is the "airgap" surface
helmet_outside = headshape_v2(2); % this is the "helmet" surface
modified_headshape = headshape_v2(3); % this is the modified headshape

% plot the triangulated surface mesh of the original headshape, with the inside of the helmet

figure
ft_plot_mesh(headshape, 'facecolor', 'skin', 'edgecolor', 'none');
ft_plot_mesh(helmet_inside, 'facecolor', 'lightblue', 'edgecolor', 'none', 'facealpha', 0.4);
ft_headlight

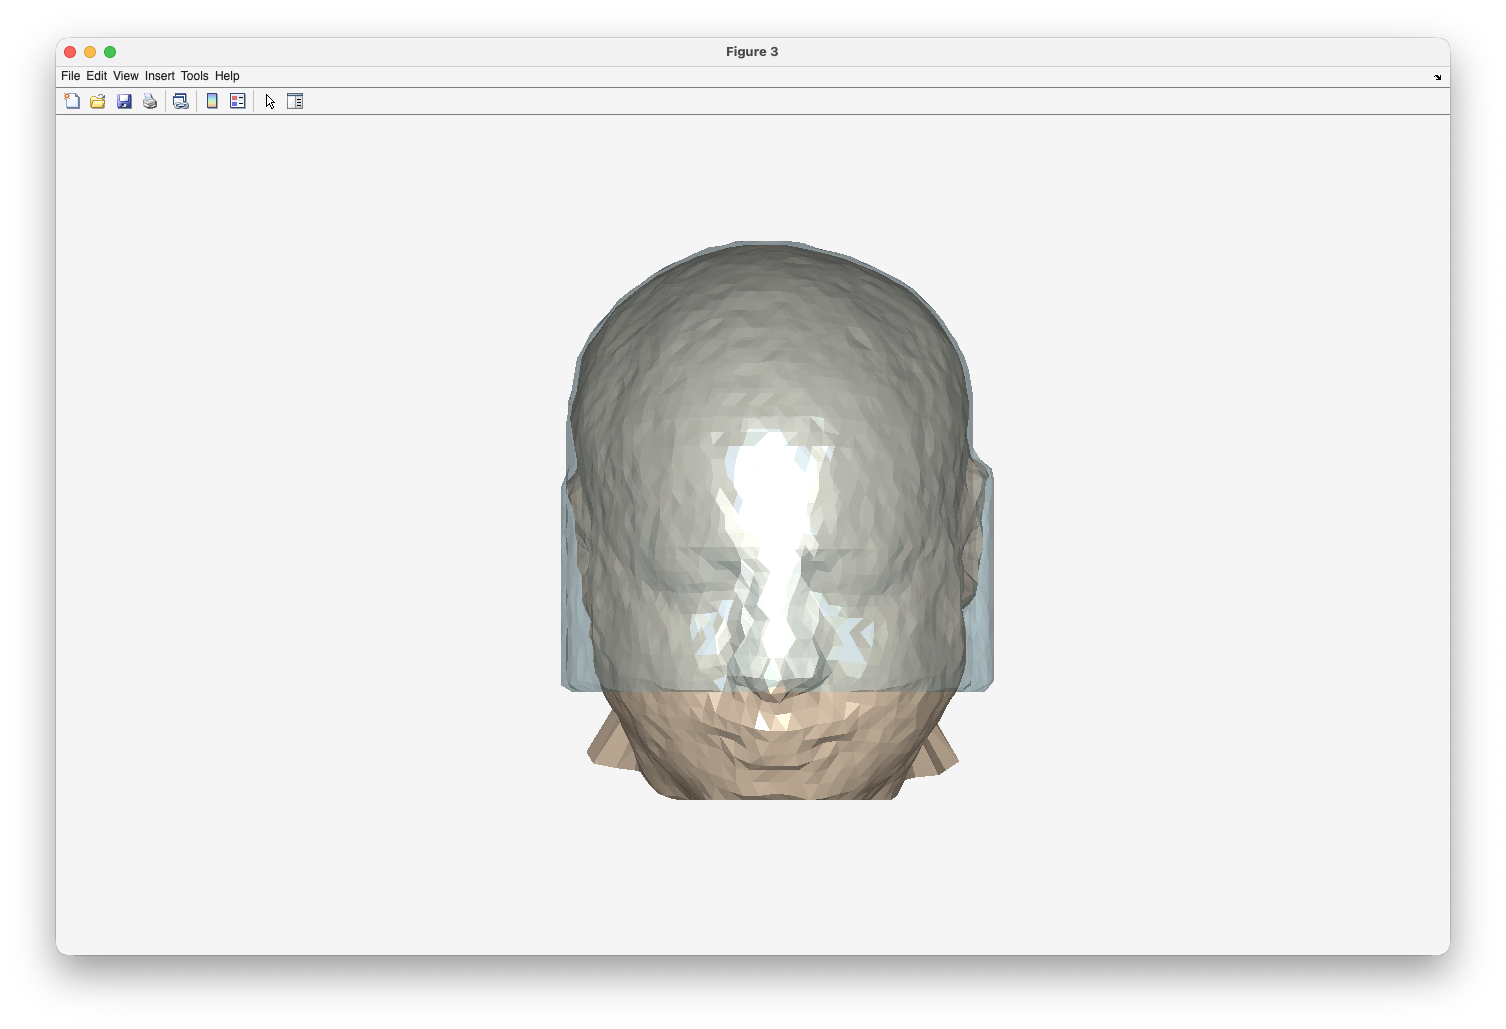
Following this, you would continue with the placement of the electrodes and OPM sensors on the modified headshape as in the tutorial on designing a custom 3D printed OPM helmet.