development / realtime / buffer_java /
FieldTrip buffer Java interface
Because the tools listed here are fairly simple, studying their source code is a good way to learn about the Java interface to the FieldTrip buffer.
Java implementation of the Buffer Server
The directory “realtime/src/buffer/java/bufferserver” contains a Java implementation of the buffer server.
Java implementation of the Buffer Client
The directory “realtime/src/buffer/java” contains a couple of Java classes that implement a client-side interface to the FieldTrip buffer (socket connections only). The classes wrap FieldTrip-style header structures, events, and client connections to a server.
The following Java code example demonstrates how to use the interface:
    import java.io.*;
    import java.nio.*;
    import nl.fcdonders.fieldtrip.*;

    class testclient {
     public static void main(String[] args) throws IOException {
        String hostname = "localhost";
        int port = 1972;

        BufferClient C = new BufferClient();    // might throw IOException
        C.connect(hostname, port);  // might throw IOException

        Header hdr = C.getHeader(); // might throw IOException

        System.out.println("#channels....: "+hdr.nChans);
        System.out.println("#samples.....: "+hdr.nSamples);
        System.out.println("#events......: "+hdr.nEvents);
        System.out.println("sampling freq: "+hdr.fSample);
        System.out.println("data type....: "+hdr.dataType);

        // print channel names, if existing (non-null)
        for (int n=0;n<hdr.nChans;n++) {
     if (hdr.labels[n] != null) {
        System.out.println("Ch. " + n + ": " + hdr.labels[n]);
           }
        }

        // try to read all data, auto-convert to floats if necessary
        float[][] data = C.getFloatData(0, hdr.nSamples-1);
        // access samples like data[sampleIndex][channelIndex] !

        // get raw data into a ByteBuffer without conversion
        DataDescription descr = new DataDescription();
        ByteBuffer rawBuf = C.getRawData(0, hdr.nSamples-1, descr);
        // inspect descr.nSamples, descr.nChans, descr.dataType for info on data

        // read events, if any
        if (hdr.nEvents > 0) {
     BufferEvent[] evs = C.getEvents(0,hdr.nEvents-1);
     for (int n=0;n<evs.length;n++) {
        System.out.println("Event: "+n+" Type="+evs[n].getTypeString()+" Value="+evs[n].getValueString());
     }
        }
        C.disconnect();
     }
  }
Writing FieldTrip buffer events
There are also a couple of tools for translating events such as incoming MIDI messages or GUI button presses into FieldTrip events. For all tools listed below, the “sample” field of the written events will be automatically inserted (either by the server or polling for the current number of samples), and the “offset” and “duration” fields will be set to zero.
Because the tools listed here are fairly simple, studying their source code is also a good way to learn about the Java interface to the FieldTrip buffer.
MidiToBuffer
The class “MidiToBuffer” can be used to listen on a MIDI in device for messages, and write them to a FieldTrip buffer. You should start the tool from the command line like (note the colon between hostname and port
java MidiToBuffer localhost:1972
The program will list the available MIDI devices, but it will not let you choose one: It seems you can only do that when your MIDI devices have both an input and output, which some devices don’t. However, you should be able to modify the sound.properties file of your JRE to pick a MIDI port.
In any case, MIDI events will be written with a type=’MIDI’ and a value that has the form of an uint8 array. For a Note-on message on channel 1, with key=64 and velocity=100 for example, you would receive
event.type  = 'MIDI'
event.value = [144 64 100]
On www.midi.org you can find a technical description of MIDI messages.
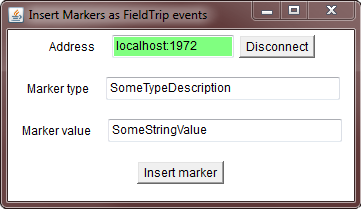
MarkerGUI
The “MarkerGUI” class can be used to insert events into a FieldTrip buffer by typing a “type” and a “value” string into GUI input fields, and pressing a button. This is mostly useful for debugging online paradigms, or maybe to control realtime applications that use buffer events for communication between each other. You can start the program from the command line by typing
java MarkerGUI [hostname:port]
If you leave out the optional argument, “localhost:1972” will be used as the default. However, you need to connect to the buffer server, and can disconnect, change the address, and re-connect at any time, using the GUI. The “Address” input field will have a light green background as long as the application is connected to the buffer server. In case of errors during writing events, the connection will be closed automatically.
Compilation
The simplest way to compile the Java tools is to change to the directory “realtime/src/buffer/java” and just to type
javac *.java
We have only tested JDK 6 (standard edition), but earlier versions might work as well.